Monday, December 22, 2008

Clean-up Changes

Wow, this blog started with just our can tab projects, but has now taken on all our crafting. So, I have decided to separate them into their own blogs.

PLEASE NOTE: I will be keeping this blog open for all my miscellaneous goings on in the crafting world, but the can tab and knitting projects will be moved to their own blogs to make it easier to navigate. I will try to keep links between them to make it easier to find things.

Hope this is not an inconvenience to anyone. Let me know if you have any suggestions that would make the transition better.

Sunday, December 14, 2008

Mom's 1st Poppet - A Cornish Pixie

After receiving this adorable House Elf Poppet for the Harry Potter Holiday Swap on craftster.org...


...mom decided to try her hand at a poppet. She decided to make a Cornish Pixie Poppet.
Photobucket

Here he is attaching the dog!
cornish pixie poppet

This is her first attempt where she did NOT read the instructions that came with the pattern (pattern/instructions) and did everything the hard way. :) I helped her attached the jointed legs/arms and the head. We are still working on the wings. I will be posting her second attempt trying this pattern following the correct instruction soon.

Sunday, December 7, 2008

Harry Potter Holiday Swap Finished

I finally sent out my Harry Potter Holiday Swap package to my partner! (Click here to go directly to my creations.) I decided to recreate a few items that might be found in various Diagon Alley shops for the Harry Potter Swap I joined recently. I also created a custom Hogwarts letter for my partner asking her as McGonagall to teach Defense Against the Dark Arts.

all - part 1

all - part 2

Here's a list of the items with links:

A Sytherin Scarf from Quality Quidditch Supplies
A Mini Wand Set from Olivanders Wand Shop
A Puffskein with box from the Magical Manegery
A Blood Quill from Scribbulus Ink
Parchment from Flourish and Blotts
A Letter from Hogwarts
Some Assorted Dread Falls

Acrylic Dread Falls

This is the last item I included in my Harry Potter swap. I was least impressed with this one. My partner had wisted some wool dread falls that were really nice looking, but having no wool available, I found a tutorial on making acrylic dreads. Lets just say, it really takes a lot of time to make these. And, I'm not really sure if my partner will actually even wear them. :)

These dread falls are made from acrylic yarn that has been brushed and mamed into dreads. You have to boil the dreads to get them to hold together. I experimented with many different things while making them. There aren't enough of the ones I made to really create the look. So, she will have to finish making more, herself. Hehe.

dread falls

I might eventually make my daughter some or make some for a future costume.

Hogwart's Letter

I really wanted to make a Hogwart's letter for my craft swap partner. However, like myself, she is a bit older than wizarding school age. I decided to either make her a "continuing education student" or an instructor at the school. Well, I finally opted for the instructor for the Defense Against the Dark Arts, since there is now an opening for the position. :)

The letter is addressed from McGonagall, requesting that my partner accept the position. I printed it on some old resume paper I had and used an envelope I'd had left over from my high school graduation invites. Yes, I keep everything! I made the seal out of polymer clay and melted a red crayon for the wax. In this case a cheapo generic crayon worked best. It stuck to the paper better and had less oil in it.

hogwarts letter

Flourish and Blotts Parchment

After making the blood quill, I thought I needed to add some parchment to write on, of course. So, I got out some 11x17" paper and started to age it. After many attempts at getting the right look, I found that instant coffee with a little yellow food coloring worked the best to get a rich warm aged look that parchment has. I was told to bake the paper on a low setting until dry. This worked really well. Repeating the process several times on the same paper gives a more convincing look. I also experimented with the brown packing paper and using green food coloring. This was another really fun and easy project. I will definitely be making more later.

parchment

parchment

Dolores Umbridge Blood Quill

Next item from the Harry Potter swap is one of my favorites. I made a blood quill from Scribbulus Ink. I made several of these out of a cheap pack of black feathers, some red ball-point pens and some string. Very easy project that is really fun to use.

I just removed the barrel of the pen, clip the end of the feather to the desired width and insert the pen into the feather. Then, wrapped some black string around to make a nice handle portion of the feather and added some silver string to the top and bottom for accent.

The box was made from a cereal box and painted/decorated.

blood quill

There is a funny story about this quill. My sister and her family were visiting and I showed them one of the quills. She slyly wrote on the back of her hand and then got our two 6year-olds' attentions. She started writing "I must not..." on some paper then grabbed her wrist and lifted back her sleeve. The two kids' eye went wide open in amazement. Hehe Then, one of them grabbed the quill and started writing on the same paper. She kept looking at her own hand to see if anything would appear. We were all rolling on the floor!

Puffskein with Box

Sorry, this post has been moved here:

http://knitty-witty.blogspot.com/2008/12/puffskein-with-box_22.html


Mini Wand Set Hairsticks

The second item I made for the Harry Potter swap was a set of mini wands made out of bamboo chopsticks and some polymer clay complete with box and certificate of autenticity. I was inspired by an idea gypsylakat had on the renaissancefestival.com website. She is making hairsticks from from the bamboo chopsticks to sell at her school. Hers are not wands, though.

I made one Severus Snape wand and one Draco Malfoy with dangly charms, which were earrings I had around since I was in high school. The wands are supposed to be from a limited edition Slytherin House set from Olivanders.

I made the wand box out of what looks like to be a wooden drawer. I added a lid made from a painted cereal box.

wand set

Here is a close up of the charms:
wand set

Slytherin Scarf

This item has been moved here:

http://knitty-witty.blogspot.com/2008/12/slytherin-scarf.html

Thursday, November 20, 2008

Turkish-style vest and belt

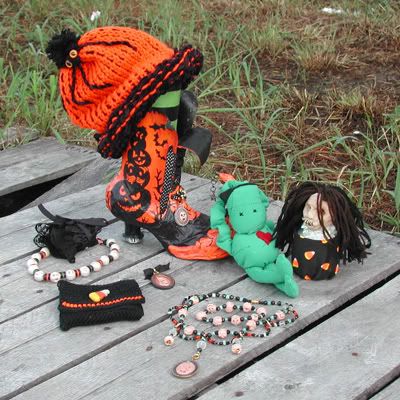
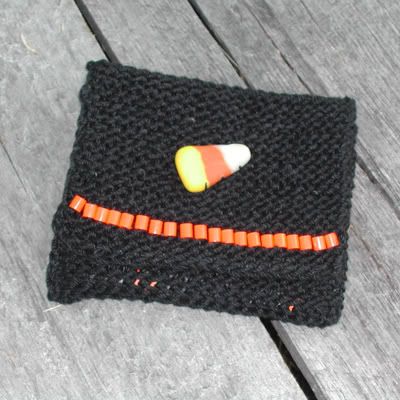
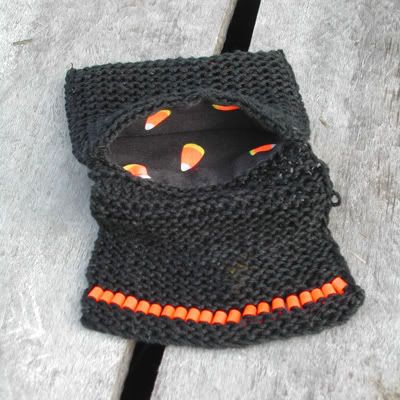
Thought I'd get around to posting my latest can tab creations. Yay!! I'm really pleased at how they turned out. (Not so pleased at my blinding white complexion or farmer-tanned arms. Yikes!) WARNING: You may need sunglasses to view these images.

I joined another Craftster swap (gallery) and my partner expressed a desire to own a turkish vest. Well, I pondered sewing one, but our machine is still acting up. So, instead I attempted (what else?) one out of tabs.

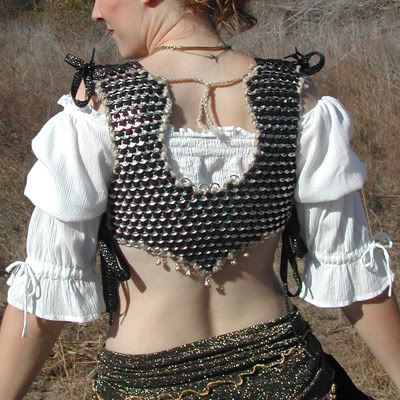
I made a prototype in black which I thought I'd better try out for comfort. I decided to make the whole thing adjustable just about anywhere I could since I couldn't measure my partner myself and she said she'd dropped a lot of weight recently. Anyway, I wore the prototype to TRF and (to my relief) it was very comfortable.

turkish_style vest made of can tabs

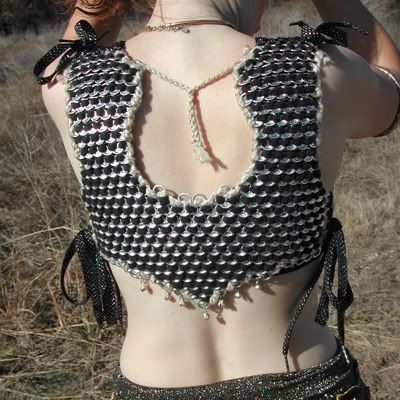
Here it is with a sleeved shirt:
turkish_style vest made of can tabs


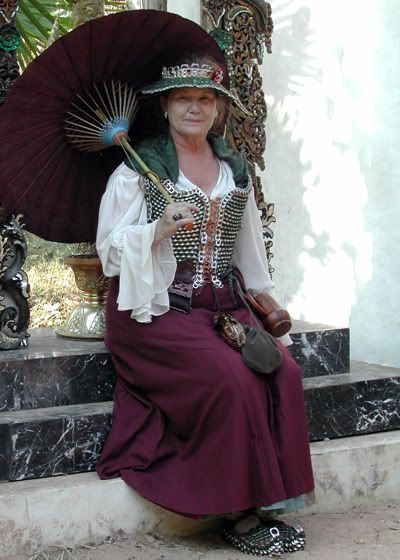
Then, on to my partners vest/belt set:

turkish vest in shade

turkish vest front

turkish vest back

turkish vest side

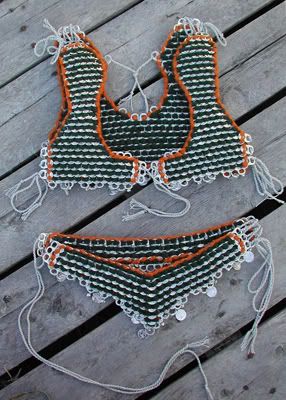
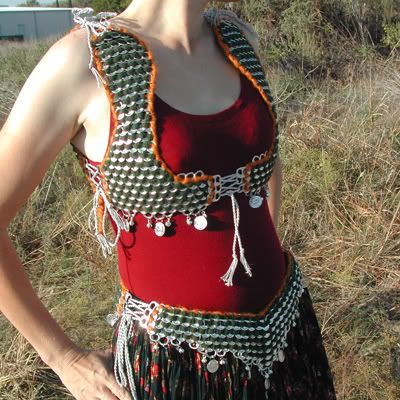
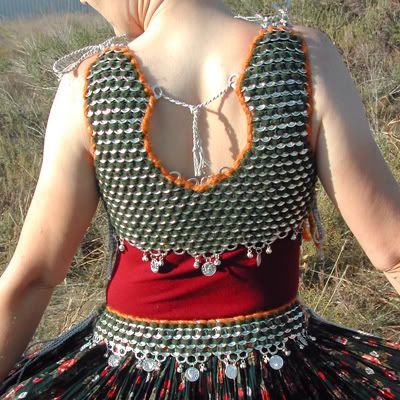
She wanted a vest that would coordinate with some turkish outfits she already had in bright pink with green and gold accents. I originally started making some armbands for another outfit she had in copper/black, but decided I should make a matching belt, instead. I would have made both, but I ran out of time. October was a crazy month for me. As you can see in the pics, I changed the style of the back of the vest a bit. However, I think I like the original back better.

Well, I hope she likes it. She really hasn't said much about it. She said she would be posting pics of it in the swap gallery soon, but I haven't seen them, yet. Still waiting to see what I will receive as well. Hope it's cool whatever it is or I want my vest/belt back! Hehe Just kiddin' :) Actually, I'm indebted to her for asking for a vest in the first place. Otherwise, I would probably never have attempted one. That would be a shame because I really like it.

*************UPDATE****************

Well, my partner up and flaked on me. Can you believe it!! I spent hours on that thing!! How rude! She didn't even post pics of what she received. I'm really bummed. :( But, on a good note, the moderator has found me a swap angel. So, I should get something at least before Scarby. *crosses fingers*

Thursday, October 16, 2008

Pics at TRF

We just recently returned from our first weekend of TRF 2008. We had a blast in our can tab outfits. Eventhough I forgot about the camera most of the time we were there, we did manage to snapped a couple pics in the beautiful gardens.

Mom in her bodice, hat, and shoes:
soda tab bodice, hat and shoes

Seems she found a companion in scale maille. See the similarly?
mom in soda tab bodice

Me in my corset and new hat:
soda tab corset and hat

soda tab corset and hat

Wednesday, September 24, 2008

Once You Pop Halloween Swap Finished!

Well, I finished my can, and it finally made it to my partner, cigarettesandvalentines! I'm describing each item on their own posts and linking to them at the bottom of this page. Hope you enjoy looking.

Here's a pic of everything together:
halloween swap items

And, a link to the great gallery pics she took: http://www.craftster.org/forum/index.php?topic=265000.80

Items:
Paper Mache Witch Boot
Spider Beanie
Apple Shrunken Head
Franky, the Voodoo Doll Pincushion
Witch Cameo Pin
Holly Go-Frightly Necklace and Ruff
Pumpkin Necklace/Bracelet/Earrings
Knitted Candy Corn Pouch

There are some really awe-inspiring cans in the gallery! Definitely worth checking out Can't wait to get my can from cigarettesandvalentines.

Knitted Candy Corn Pouch

Of all the items for the OYP Halloween swap, this one took the most time and I was least happy with. The candy corn on front is polymer clay that I sewed on. The inside has candy corn lining. I used a metal dog comb that I pulled some of the teeth out of to knit the pouch using garter stitch with a black cotton crochet string. I knitted a single row of orange plastic bead into the knit just as an experiment. If you're curious about the comb knitting, see my other post about pick knitting.

Candy Corn knitted jewelry pouch

Pumpkin Necklace/Bracelet/Earrings

Another item for the OYP Halloween swap, this jewelry set where the necklace is customizable. You can mix and match the pieces to wear in different ways.

Here are all the pieces together:


And, separate:


The pumpkins are made with polymer clay and have unique faces. I used lobster claw clasps to attach all the pieces together. All the other beads were parts left from dollar store necklaces I bought many years ago to rework. I was pretty happy with how this piece turned out.

Holly Go-Frightly Necklace and Ruff

This necklace was also for the OYP Halloween swap. I tried to make something that was a combination of a couple items in her wist but with a halloween theme. They can be worn together or apart and tie in the back with a ribbon.

Together:
Holly Go-frightly necklace with ruff collar
Necklace
Holly Go-frightly necklace
Ruff collar
Ruff collar

Although it is difficult to see, I mixed some glow-in-the-dark clay in with the white giving it a faint glow under a blacklight. I also dusted the beads with white pearl eyeshadow before and after baking to give the pearly sheen. The eyeshadow sticks to the clay really well.

Witch Cameo Pin - polymer clay

Yet another item for the OYP Halloween swap, this is a witch cameo pin made out of polymer clay and hung from a pin back with a ribbon bow. I made the back out of black clay and pressed the cameo part into it. The gold rim is painted on. I cheated a bit on the cameo. To make the face I pressed a bellydance coin of a female into the clay. I then altered some features like the nose, which is a little sloppy, and added the hat. It is really hard to see all those imperfections until you antique it.

witch cameo

Franky, the Voodoo Doll Pincushion

Ever get frustrating at the sewing gods while working on that Halloween costume. Well, now you can take it out on Franky. He just hangs around on you upper arm from his elastic scruchy arms waiting to take all the curses you can dish out.

Franky was made for the OYP Halloween swap. I put a metal disc from the ends of those biscuit dough rolls inside the back to stop the pins from going all the way through. For the body we used an old pair of green jersey knit pants my mom had and some scrap felt hair.

franky the voodoo pin cushion doll

We even put a pocket in the back to put your needle threader and other items.
franky the voodoo pin cushion doll

My sis and her daughter are wanting one of these. If I get another made I will add pics in here.

Apple Shrunken Head

These are so fun and easy to make! However, you need at least 2 weeks to achieve success. I started this as the 1st item for the OPY swap, but it was the last one finished. As you can see inthe pics, I had planned to put it on a spring and have it jump out at her, but I ran out of room in the can. And, the hair was so thick it wouldn't slide out very well. I ended up removing the ugly spring underneath and just tying it to the lid.

apple shrunken head
apple shrunken head

To make one, you carve the face in the apple after removing the skin. Soak it in a mixture of lemon juice, salt and water for 24 hours. Then, you let it hang for 2 weeks or bake it on 200 degrees in the oven until it starts to dry. Once it is done shriveling and shrinking you can seal it and start decorating. The eyes I used are the same cat eyes on the spider beanie with the exception that I scratched off some of the paint and repainted it red to get the bloodshot streaks on the iris.

Spider Beanie

This item, which was the first thing I completed for the OYP swap, didn't fit in the can. Well, it did before I made everything else, but here it is modeled by me:

knitted spider hat

knitted spider hat

I used scrap yarn I was given. The orange/black (acrylic?) yarn is kinda scratchy, so I put a thick fuzzy chenille type on the band around the head. The knit pattern was made on my DIY pen loom with a slightly altered rib stitch I learned online. I made the pom pom body, but the head is a store bought pom pom I had left from another project. The spider (cat) eyes were also bought for another project. Overall, I think it turned out really cute. It looks ordinary until you see it from the back staring at you.

My daughter didn't want to give it up, so I guess I'll be making her one. Probably pink/brown.

Paper Mache Witch Boot

To decorate the can for the OYP Halloween Swap I made a paper mache boot:

witch boot with leg
Note the Pringles guy JOL.
witch boot with leg

The can leg is removable and is a poison bottle. On it's label were the contents of the package inside. I didn't tak any pics of it finished, but my partner has a pic in the gallery images. Here is the label:

poison label front

poison label back

My sister came up with the idea to add what I'm calling "fiendship" pins to the laces:

fiendship pins

To make the paper mache boot I used a large Frosted Flakes cereal box for the sides and some free newspapers I dug out of the post office trash cans by the mailboxes for most of the rest of it. (Yes, I was dumpster diving for them. It's usually only full of junk mail discarded when sorting mail, anyway, so :p.) I used a cut up toilet paper tube for the heel. Everything was held together with masking tape before I pasted the newspaper strips on. I glued it with wallpaper paste, although Elmer's glue watered down would work just as well. The paste that I used , which is a powder, I've had since 1991! That's some old paste! Worked like new! I can't believe I've hauled that stuff with me for this many years. Still have a lot left, too.

Anyway, here are some pics before I painted it:
witch boot unpainted

I'll be posting each item separately and linking them all in my last post. To many pics for one post!