Monday, November 9, 2009

Image Viewing Problem

Yikes! Bandwidth Exceeded!

You may have noticed some of my images aren't showing up these days. I just wanted to let everyone know that this is a temporary problem. Should be back to normal around the 18th of this month. I was using Photobucket.com to host my images, and it seems they only allow a limited amount of traffic every month for non pro accounts. If this happens again, I will move the images to a new host. Or, I may have to consider taking up donations to open a pro account in the future.

Sorry for the inconvenience.

Mieljolie

Monday, November 2, 2009

Braided Hair Falls with Instructions

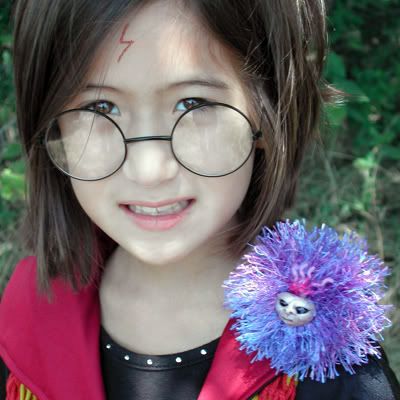
I've been wanting to make myself some of these hair falls ever since last years Harry Potter swap when I made syntheytic dreads for my swap partner. Finally managed to make enough to wear with my outfit! I was still braiding them in the car on the way there!

kristen_n_me

I made these hair falls out of acrylic yarn using mostly regular braiding and twist braiding made with black Lion Brand's Homespun and a little Parfait colored Boucle. I think the hair falls were fun and really make the outfit. They did get a LOT of attention. Since they were only safety pinned on, I also gave a few away as... well... favors, I guess. :)

Now, if you want to try some of these braids, yourself, you'll need LOTS of yarn (and time) and a pair of scissors. I found a wonderful indepth tutorial here for making acrylic dreads. This is what I based mine on, but I didn't spend the extra time unraveling, combing, and boiling the yarn for these. However, even though the initial construction is the same, her dreads will probably hold up longer, especially if you take the extra time to glue soak them. Besides, braided falls tend to be a great deal heavier than the matted dreads.
  • I cut two pieces of yarn about 2 and a half times the length you want the finished fall to be.
  • Then, cut a third piece about a hands length (finger tip to wrist) longer. This longer piece is used to tie the strand together and form the loop on top to hang it from.
  • I start by folding the three strands in half over my hand and pulling the longest one even with the other strands on one end so that the tail hangs down on just one side. Find the middle and align them just an inch and a half to two inches off with the tail end being longer.
  • Separate the long tail strand from the rest up to the middle point. Start tying knots with just the long tail over the other strands. I made about 10 alternated pairs of half knots to prevent the twisting effect.
  • Once the knots are finished, I tied the two ends of the long strand together in a square (double) knot to form the loop.
  • Then, using a small safety pin attach this to something sturdy to start braiding. You'll want to start out very loose and get tighter with the braiding toward the tip. You really need to braid loosely. I tighten up the braiding for the last few inches just to give it a more tapering look.
To add the color, before braiding cut one or two lengths of your contrasting yarn depending on it's thickness and poke it through the top loop you created matching up the ends. Now you can divide up the strands and braid it as normal.

I wrapped my ends with another thinner string. Embroidery floss or that thin crochet yarn would work. You'll need anywhere from 1 to 2 yards. You can fold the ends of the braid over for a clean blunt tip or leave them hanging for a pom pom or tassel like end.
  • I fold the string beside the braid forming a loop near the tip end of the braid. Starting back to toward the middle, wrap over the string and braid tightly toward the end leaving a tail of a few inches exposed.
  • Once the wrap is the length you want, poke the wrapping end of string through the string loop and pull the other end you wrapped over. This should pull the loop into the wrap hiding it. Don't pull too hard. You don't want the end to come out the other side. If it does, just pull it back the other way using the other end.
  • Next, I give both ends of the string a good pull at the same time to tighten any slack.
  • Finally, just trim the ends off and you're done.
You can also add all kinds of doodads to your braids using jump rings or clasps. Or, just sew beads and things right on to them with thread.

If your braids start to look fuzzy from wearing, you can try boiling them to shrink the fuzz back into the braid. Just note that the braid will get shorter and tighter, as well. The tute link above suggests soaking them in a glue/water mixture to prevent them from getting fuzzy.

I'll try to get some pics up to illustrate the process if anyone is interested. I'm planning to make some piratey dreads for my mom's pirate outfit.

BTW, I'm pictured with Kristen whom I met at the McLotofus camp. She sewed her own garb including that beautiful bodice! Isn't it lovely! My pics always throw off the colors, its actually a bit greener than the blouse making it look perfect with her peacock earrings and necklace.

Saturday, October 17, 2009

Harry Potter Unity Scarf Finished

Introducing the scarf that seemed like it would never end. It's inspired by the Harry Potter Unity Scarf that Neville Longbottom and other students wore during the "Goblet of Fire" movie. And, modeling this warm cozy scarf is my new duct tape "body double" dressform.

unity scarf

The "H" crest on one end is something I added. I love the colors and thickness of this scarf. I made it for my mom who should get some use out of it a t TRF camping this years. Looks like it might be a chilly fall/winter here.

I'm cross-posting this from my loom knitting blog if you want to see or read more about how it is constructed. The link is:

http://knitty-witty.blogspot.com/2009/10/hp-unity-scarf-finally-finished.html


Until next time!

Saturday, October 10, 2009

The Body Double - Duct Tape Dressform

Recently, I was inspired to try making a duct tape dress form "loosely" following instructions found here:

http://www.threadsmagazine.com/item/3659/clone-yourself-a-fitting-assistant

So, less than $15 later, I have a new custom dressform with adjustable height! To find out more about how I did it, read on below.

covered front

covered back

When I say "loosely" followed the instruction, I mean that I did a LOT of substitution. But, I am pretty happy with the results. If I gave it another go, I know it would be even better.

duct tape dress form

  • I started with the old t-shirt and added a pair of shorts to make it a bit longer. They suggest that you use cling wrap on exposed parts, but I didn't have any. But, I recommend using it to get a longer arm and lower hips.

  • Most of my investment went into the duct tape. I used TEN rolls of the cheap stuff at $1 a pop that barely covered me in two layers! I don't suggest scrimping on the tape.

  • I used a heavy duty coat hanger that I already had to support the shoulders and an adjustable shower rod for the pole, which is great. I taped the hanger to the pole with more duct tape. I can readjust the height of my dress form to hem dresses/skirts allowing for wearing heels or no heels. It also turns really easy. Leaving the hanger hook on will allow me to remove the base, shorten the pole and hang it out of sight in the closet. Marking the pole with permanent marker, tape or a scratch will help in resetting the height correctly.

  • I stuffed my form with plastic grocery bags. We always have a ton of these around. I try to find uses for them, but never seem to keep up with them. I never remember to bring my own bags shopping with me. And, the cashier never seems to listen when I tell them the bag can hold more. :) Anyway, I managed to use up every bag in the house for this project! But, I did stuff it pretty tight.

  • As recommended, I put a piece of cardboard in the bottom after stuffing and taped it on with more duct tape. It needs to have a hole cut in the center for the pole and be fairly the shape/size of your hips. I really believe this was the most difficult part of the project. :) For accuracy, the pole needs to be aligned through the form to mirror your posture when you stand.

  • The base is a plastic Christmas tree stand that I bought at a thrift store for $1. I could have purchased a metal one, but we agreed that the plastic one looked better. I may spray it silver in the future. I was concerned it would be top heavy when finished, but the plastic bags didn't add much weight. So, with much relief, it stands pretty sturdy.

  • I covered the finished form in tan polar fleece for taking photos. Which reminds me that I discovered pinning into the duct tape is NOT a good idea. The pins get all gummy. It works better to just pin into the fleece layer.
After all is finished, I would definitely recommend this project to those who like to sew or just make costumes in general. Its very useful, inexpensive to make and doesn't take a great deal of time to complete. I'm sure I will need to make a new one in a couple years, but I can pretty much reuse most of it, except for the duct tape.

Thanks for takin' a peek at my blog. In the near future I should hopefully be posting many new projects made using my new assistant.

Tuesday, August 11, 2009

Arnold the Pygmy Puff v2 HP&HBP

I just posted our entry for the Leaky Cauldrons August HBP Contest on my loom knitting blog, but wanted to share it here for all the Harry Potter fans.

arnold the pygmy puff

Hurry up and go see more of it here:

http://knitty-witty.blogspot.com/2009/08/pygmy-puff-version-2-on-diy-loom.html

Thursday, July 23, 2009

Bone Necklace

While visiting my sis in Kansas, we got to working on some jewelry. I wanted to make a necklace for my voo-dooey witch costume I've been putting together. Here is my first attempt:

voodoo bone necklace

voodoo bone necklace side

voodoo bone necklace front closeup

voodoo bone necklace side closeup

I'm calling the pendant the skull of a "Spiny Turkish Water Sprite". It's made with turkey bones I saved from last Thanksgiving. Had to boil them for quite a long time to get them clean. I think it is too white. I probably need to stain the bone to get a natural looking yellow color.

Tuesday, May 5, 2009

Yay, I won first!!


My "eater eggs" entry in the leaky enchanted egg contest took FIRST place! I'm soo happy! There were so many great entries, like an entire Quidditch stadium in an egg and an adorable crochet golden snitch egg. This makes this gloomy Tuesday much brighter! :)

*****UPDATE 05-14-09*****

As promised, here are the pics of the prize I won:


Enchanted Egg Prize

Enchanted Egg Prize

Enchanted Egg Prize

I received a carton full of 12 adorable crochet eggs in all four Hogwart's house colors! Thank you very much, Crafty Witches!

Thursday, April 30, 2009

Harry Potter Eater Egg Containers

Sending more Harry Potter crafting goodness at'cha!

Whew, I just finished these in time for the "Enchanted Egg Contest" at the Leaky Cauldron website. My internets been flakey lately, so I hope I got them in on time. **crosses fingers** The contest was to create a Harry Potter themed item in the shape of an egg.

Eater Egg front view

Eater Eggs side open

Eater Eggs side view

I'm calling these Eater Eggs! As in Death Eater masks. They are containers made of polymer clay in the shape of eggs. The small one was formed over foil. The larger one was actually formed over an egg.

Wish me luck in the contest!

Wednesday, April 1, 2009

Harry Potter Death Eater Mask

While visiting my sister, we decided to craft some more with paper mache. I decided to try making a Death Eater mask inspired by the 5th movie, Order of the Phoenix.

Photobucket

Photobucket

Here's a closeup of the mouth:

It was a real pain cutting those decorative pieces on the mouth out with a pair of craft scissors, but that's all that was available at her house. Sheesh. And she calls herself an crafter. :)

I started by covering cereal box cardboard with masking tape and regular newspaper strips soaked in all-purpose flour. My sis had some Claycrete paper mache mix. I'd never tried using this before. It looks like spit balls when wet and something like cottage cheese when dry. I covered the newspaper with it to build up the cheek bones and other protrusions. Being really rough, though, I went back over it when dry with some paper clay (that brings back found memories for me. I used to make jewelry out of something like the paper clay just before Sculpey was available. It's fun to carve into.) The paper clay spreads and smooths out nicely when slightly wetted.

The mask, from start to finish, took about 2 evenings to create due to drying time, but this was significantly reduced by baking at a low temp. It is actually "bronze" paint that I used on most of the mask, though it looks copper to me.

Well, the Dark Lord is calling. Must go. Enjoy!

Sunday, March 22, 2009

Mini Macrame Owls

For a personal swap I finished for my sister, my mom and I made some tiny macrame "hedwig" owls. One is a keychain holding a broom. The other is an adjustable necklace holding a letter.

Macrame Owl

Macrame Owl

Macrame Owl

When we were young my mom once made some similar owls into pins that we gave out to relatives and teachers. She was inspired by the large owl wall hangings popular in the 70's. At that time she used toothpicks and cotton kite string. I can still remember how cute thet turned out.

Tuesday, March 10, 2009

Mini Paper Mache Witch Boot

I received a request recently from oohmybees on Craftster for a personal swap for my can tab Turkish Vest pattern and a paper mache witch boot like the one I made for Craftster's OYP swap. For shipping sake, I made the boot less than half the size of the original, which I think turned out really cute.

Here are some pics I took of the mini witch boot finished:

paper mache mini witch boot

paper mache mini witch boot

paper mache mini witch boot

paper mache mini witch boot

paper mache mini witch boot

It's about 6" tall with different color on each side and a polymer clay pendant laced into the shoestring.

In return, I received the coolest "slither" arm warmers like a pair she had made for herself on her blog, Crafterella. She also threw in a beautiful Mokume Gane (polymer clay) Necklace similar to the one in her Etsy listings.


She has some amazing stuff on Etsy worth taking a look at! I posted some action pics and links of what I received in Craftster's personal swap gallery. I think this is one of my favorite swaps I've participated in so far.

Wednesday, January 28, 2009

Snowman Bottle Covers with Tute!

I know it's a bit late for the holidays, but I wanted to post these Snowman Bottle Covers I made a few years ago for gifts. They were a big success (or maybe it was the wine and alcohol that was in them. Hehe.)

Photobucket

Photobucket

Photobucket

I sewed them out of towels using elastic to gather the sections. The bottom is open to slip the bottle in while the top is open to pour your drink. I put hats on their heads to hide the top when not in use. I used chenille stem for the nose and arms and black beads for the coal mouth. eyes, and buttons. Some of the ones I gave out had rosey cheeks, but I didn't keep any of those.

NOTE: Please read everything through before starting. I didn't make a pattern for this when I made them. But, upon requests, I have attempted one here. Please try it and tell me if it works out for you.

To make body:

Photobucket
My attempt to recreate the shape of the pattern.

  1. Cut a cone shape with a hole big enough for the bottle neck and base out of a white bath/hand towel. Make it a little taller than the bottle. Wrap it loosely around the bottle to see that it will fit right
  2. Trace a second out of a liner fabric. Cut out and set it aside.
  3. Eyeball the placement for the elastic. Divide the towel fabric into thirds drawing lines on the wrong side. Sew two thin elastic bands along the lines while stretching as you sew.
  4. Baste & gather the bottom edges of both the towel and liner fabrics right sides together. Sew over the basting the set gathers in place.
  5. Unfold and sew the two pieces into one long continuous tube/cone thingy rightsides together along the side seam.
  6. Fold the liner into the inside at the middle (actually the bottom) seam and stuff between the layers shaping at each section. It stays in place pretty well without sewing the sections.
  7. Roll the towel fabric into a casing at the top edge with the liner fabric tucked into the roll and sew the casing down. Leave an opening about 1-1.5". Fish another piece of elastic through the casing. Tighten 'til it gathers and tie elastic in a knot. Sew up the opening in the casing. Try it out on your bottle.

Decorate

  • Nose - I made a tapering coil out of orange chenille stem for the nose. Glue to body with fabric glue.
  • Arms - Cut 2 piece of chenille in half and cut 1 of the halves in half again. You should have 6 pieces. Make a little loop on one end of each of the 2 long pieces of chenille. THis is what you will attach to the body. Twist the shorter pieces around the long longs at the opposite ends for fingers. Glue to body with fabric glue.
  • Mouth, Eyes, Buttons - I used about 9-10 cheap plastic beveled beads for the mouth (4-5), eyes (2), and buttons (3). I glued the chenille to the towel fabric with fabric glue and sewed the beads on. Glue or sew the beads to the body.
  • Rosey Cheeks - I used a little blush/rouge on the cheeks (not pictured).
  • Scarf & Hat - Both are made out of polar fleece. The hat has a homemade pom pom mage of white yarn.

Saturday, January 10, 2009

Geezer the House Elf Poppet

If you saw my blog post for the cornish pixie, you will kinda recognize this pattern. We got it from the Poppet-Along on Craftster.org. It is a really great pattern that is very easy to follow. Anyway, we tried our hands at a House Elf after my partner in the Harry Potter Holiday Swap (Gallery) made me one out of the same pattern. Hers is sooo cute that my niece flipped and wanted one. So, mom told her mother we would give it a try. After waiting what seemed like an eternity for the eyes, our first house elf is finally finished.

So without further ado...***drum roll***...

GEEZER, the House Elf!!!


house elf jumping
At his favorite past time, jumping on the bed!

house elf by wardrobe
He has dishonored his family and is now banging his head on the wardrobe.

house elf in wardrobe

We used polar fleece fabric and a handkerchief for the tea towel.

We haven't finished the wings for the pixies, yet. Should be done, soon. Then, there are more pixies and another house elf planned for the near future.