Good grief, it's been a long while since I posted last! Sorry 'bout that. I'm going to share some recipes we tried for our Harry Potter themed birthday party back in November. I tested quite a few I found online, but I wanted the simplest recipes that provided the best taste. Since we were going to be serving two elaborate dinners and feeding guest for 2 and a half days, I needed them to be as quick and simple as possible.

Pumpkin Juice (and Pumpkin Pasties)
- Pumpkin Pie Filling (Already spiced, strained)
- Mulled Apple Cider
Though I tried a couple recipes, including those that used fresh sugar pumpkins to puree from a can. I found the simplest one tasted best, in my opinion, and was much more convenient. By the time I was finished, I used two 30 oz. cans of Pie Filling that were already flavored with spices. I strained it through a piece of cloth to get out as much liquid as possible. My first attempt yielded about 1/2 cup of liquid per can. So, I poured some apple cider into the filling and filtered it again. The apple cider helped more pumpkin flavor pass through the filter into the liquid. The apple cider also really improves the flavor of the pumpkin juice. This is really convenient way to make the juice because I found the filling too runny for the pasties as it was, anyway. So, draining out the liquid helped to make the pasties less messy. Before I was finished, I had poured about a half gallon of cider into the pumpkin juice. You can serve this stuff as is, chilled or warm it.
 It might be interesting to note, my sister and her family took a trip to Universal's Harry Potter World this past October. And, they brought back some treats, one of which was a bottle of Pumpkin Juice. We tasted it in comparison with our own homemade version. It was very close. And, I have to agree with her. It is better warmed.

Pumpkin Pasties Version 1
- Strained Pumpkin Pie Filling (use leftover from pumpkin juice)
- Premade Rolled Pie Crusts (about 16 pasties per package of 2 crusts)
- Cinnamon/Sugar or Icing to Taste
Again, I opted for the simplest recipes I could find or come up with. Most wanted you to prebake the filling or add extra ingredients like evaporated milk or eggs. I decided to just use the pie filling as is after straining. The first pasties we attempted were using premade pie crust. You get about 16 pumpkin shaped pasties, or you can make twice as many of the folded variety in much less time.

I cut a plastic bottle in half to use as a round cookie cutter. You'll need two circle shaped for each pasty. Then used a table knife to score the pumpkin lines and cut out the faces of one circle. Then, put a teaspoon of filling on undecorated half and place decorated half on top. Wet edges to help them stick when pressing. Last, I cut the stem shapes out and baked. It took a bit of time/labor that could have been saved by making cutters for the eyes, mouths and stems.
I made a few different versions attempting to sweeten the crust a bit. I tries sprinkling with cinnamon/sugar, and glazing with icing. In the above version I smeared a bit of pumpkin filling/juice on and lightly sprinkled with cinnamon/sugar mix. I have to say, no matter which version, they were very cute and edible. Although, to use up the filling from two cans, it's gonna take quite a few pasties! Be prepared to use some filling in other recipes or have LOTS of hungry guests.

Pumpkin Pasties Version 2
- Strained Pumpkin Pie Filling (from juice)
- Pillsbury Golden Layers Honey Butter Junior Size Biscuits


As I mentioned, we tried many attempts at pumpkin pasties. For this version, I used biscuit dough in a mini bundt cake pan and filled with the pie filling. The can of biscuits made 10 pasties. I had to split the biscuit in half and place in the pan cups; add about a tablespoon of filling; and replace the biscuit top pressing the edges down. (It may help to moisten the edge with a little water.)
Though the pie crust ones look the cutest, the mini bundt cake biscuit dough with filling were the best tasting. The sweet honey butter of the biscuits and the pumpkin filling complimented each other nicely. We also tried some pumpkin bread using our ample supply of pie filling in the same pan that turned out pretty good. I'm thinking a green gumdrop or icing stem would really help make these look more like pumpkins. But, otherwise, the biscuit versions were delicious, and more what I imagine a pumpkin pastie to be in the magical world. (This bundt cake pan could also lend itself easily to making cauldron cakes.)
 Hagrid Cake
- Chocolate Cake Mix (Devils Food)
- White Butter Cream Frosting
- Red food coloring
- Green Icing
- Round Cake Pan
- White Cardboard Cake Box (optional)
A replica Hagrid cake was a request of the daughter. So we made it look as much like the original in the movie as possible. She said it was her favorite cake she had. But, honestly, it's is hard to go wrong with chocolate cake.
Polyjuice Potion
- Chocolate Ice Cream
- Frozen Blueberries or Mixed Fruit
- A little Milk
- Hand mixer
Another easy recipe we just threw together to appear to be Polyjuice potion. I used blueberries to alter the color of the chocolate, but you could leave it plain or color with your own ingredients. I think a few drops of green food coloring could really make it look like the potion from the movie. My mom found the four glasses at a thrift store. Good eye! We lined our plastic cauldron with a glass mixing bowl for easier cleaning. (I wanted to try adding dry ice or making our own chocolate ice cream, but that will have to wait for next time.)

Chocolate Frogs
Frog
- Hershey's chocolate
- Plastic Frog-shaped Mold
- Microwave
Decorative Box
- Illustration found online
- Cardstock
- Printer
- Scissors/Exacto Knife
- Glue
- Scoring Tool such as credit card or back of knife
Chocolate Frogs were a must for the party. The ones licensed ones you can get really failed on the packaging. However, we found the box pattern online. The frogs were a bit more difficult, but not too bad. I looked everywhere for a mold for making frogs. I finally found a cheap plastic one for making soap at Hobby Lobby where I used a 40% off coupon making it cost me about $1. Then, I just melted some chocolate bars for a minute or two (stirring occasionally) in the microwave on half power and poured into the mold. Then, pop them into the freezer for about 10 minutes, and set out to warm and set. Had to be gentle releasing them from the mold. We lost a few toes.
I think it would be a good idea to wrap the frogs in foil or place on a small piece of parchment paper, so the oil in them doesn't ruin the box. The boxes, along with those for the Bertie Bott's Beans, were printed at our local Print Shop. I don't recommend ink jet printing that may get wet and bleed if you want something as a keepsake. We used standard 80 lb cardstock just fine, but I recommend using something just a wee bit heavier.

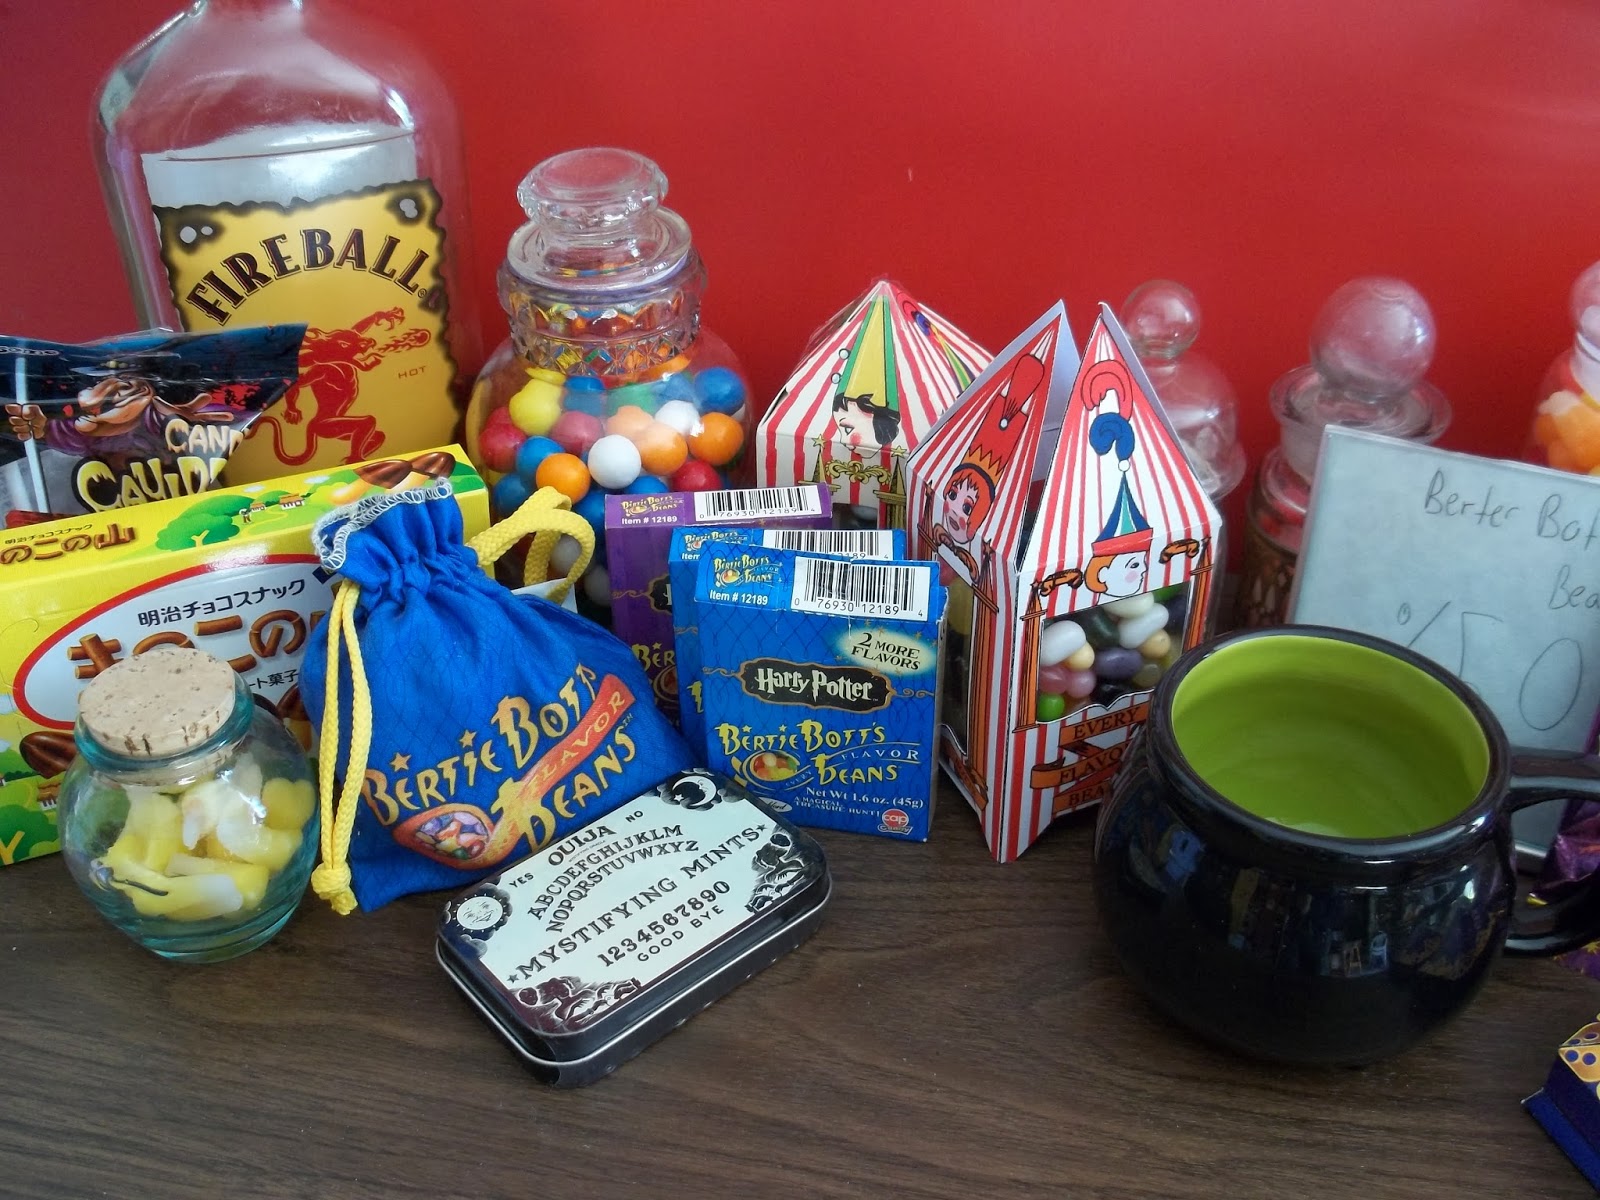
Bertie Bott's Every Flavor Beans
- Jelly Belly Gourmet Jelly Beans
- Cardstock
- Printer
- Scissors/Exacto Knife
- Glue
- Clear packaging like that from toys for the windows
Can you spot the DIY box? Bertie Bott's Beans had a great box in the movie that, again, the licensed version kinda failed on. Even the box sold at the amusement park lacks the legs that really set the box off. I found a version online that resembled it better. I used Jelly Belly beans because I like their safer flavors. I used packaging from the daughter's old toys to make the clear windows in the box.
Fungus Peanuts
- Caramel Popcorn
- Peanuts
- Milk and White Chocolate Chips (melted)
Even though our tombstone Death Day cake exploded, we did enjoy our Fungus Peanuts. We will probably revisit this party theme on a later date. We cheated and spotted these in the store, but they don't look that difficult to recreate. But, it sure did look questionably edible in the bowl. Haha :)